Table of Contents
Starling Builder
- author:
- Johann Huang
- description:
- User Interface Editor for Starling
- tag:
- GUI, editor, user interface
- dependency:
- Adobe AIR, Starling Framework
- editor download:
- http://starlingbuilder.github.io/download.html
- editor tutorial:
- http://starlingbuilder.github.io/tutorial.html
- engine source:
- https://github.com/yuhengh/starling-builder-engine
- editor source:
- https://github.com/yuhengh/starling-builder-editor
- api reference:
- http://starlingbuilder.github.io/api/
- forum:
- http://forum.starling-framework.org/forum/starling-builder
- 中文版:
- http://wiki.starling-framework.org/builder/start/cn
Overview
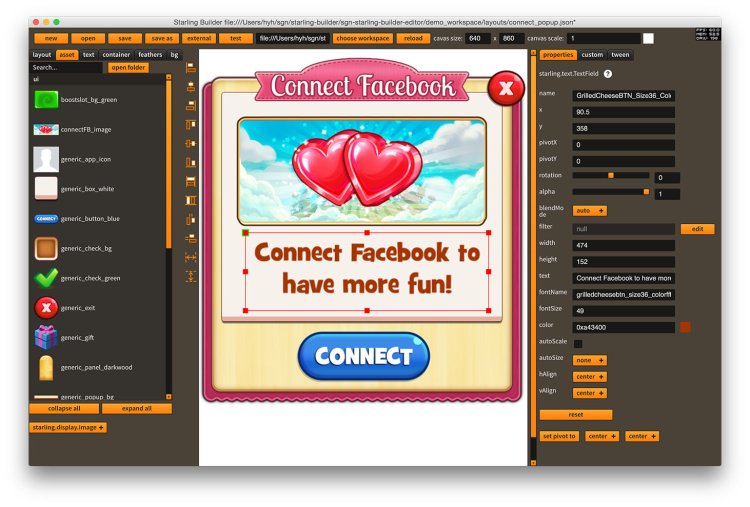
Starling Builder is an open source user interface editor for Starling.
It’s built on top of Starling/Feathers UI framework. You can edit your user interfaces in Starling Builder, export them to JSON layout files, and create the starling display objects directly in the game. It provides an WYSIWYG way to create any in-game UI in minutes.
There are 2 parts in Starling Builder: the engine and the editor. The engine is a module responsible for converting layout files into display objects. Both the game and the editor rely on it. The editor is a standalone application where you create your UI layouts.
Starling Builder supports the following features
- Create and edit Starling/Feathers/Custom UI elements
- Customize what components and properties can be edited through config file
- Support nested components (through Sprite/LayoutGroup/ScrollContainer etc.)
- Support nested layout (a layout contains another layout)
- Support custom class (create a generic game-agnostic class in editor but initiate a custom game-specific class in game)
- Support localization and switch languages inside the editor
How to create UI from the editor
The first time you run the editor, you are prompted to choose a workspace. Workspace is a folder you need to specify in order to load all the resources you need. It can be an empty folder if you don’t have one set up. By default the editor will load all the assets from textures and fonts folder. The libs folder is the place you can put certain predefined swf runtime library. (more information) After you choose the workspace, if those folders don't exist, the app will create empty folders for you.
You can download the latest editor binary and demo workspace at http://starlingbuilder.github.io/download.html. There are 2 versions of the editor(Starling 1.x and Starling 2.x). Please make sure to download the one you are planning to use in your project.
In order to run the demo, you can set it to your workspace folder. The demo layout files are inside layout folder, but feel free to save your layout files to anywhere in your computer.
When you finish editing a layout file, you can hit test button to test the ui. The ui you are testing is a new one recreated from the layout file. You can test it under either editor mode and game mode, which will be slightly different depending on your setting. (more information)
How to put it into the game
All you need to do is copy the engine source code (starlingbuilder.engine.*), your assets, and the layout files into the game
In your game, create an UIBuilder instance and pass in an AssetMediator as parameter. (AssetMediator is a class implementing the IAssetMediator interface, which defines what UIBuilder needs from the game. You can use DefaultAssetMediator or extend it).
After that, call UIBuilder.create function to load in the layout file, it will generate the display object list for you. That’s it, you are good to go!
If you need to change the ui element, you can use getChildByName to get what you want and set its properties.
uiBuilder = new UIBuilder(new DefaultAssetMediator(assetManager));

...

var data:Object = JSON.parse(new EmbeddedLayouts.mail_popup());
var sprite:Sprite = uiBuilder.create(data) as Sprite;
addChild(sprite);
Alternatively, you can call create method with a binder, it will automatically bind all properties of UI components starts with “_” inside the layout file to the binder object. This way you can remove all the boilerplate code like this _okButton = _root.getChildByName(“_okButton”);
public class MailPopup extends Sprite
{
    //auto-bind variables
    public var _root:Sprite;
    public var _okButton:Button;

    public function ExamplePopup()
    {
        var data:Object = JSON.parse(new EmbeddedLayouts.mail_popup());
        addChild(uiBuilder.create(data, true, this));
    }
}
Since the ui is generated in runtime, you need to make sure that the ui component is linked into your project. If not, you will need to link them manually, something like this will do the trick.
public static const linkers:Array = [Button, LayoutGroup];
Here’s a demo project to showcase the usage of the client.
Basics
In-depth
Extensions
More Info
Introducing Starling Builder from the official Starling blog
Extending Starling Builder talk from Flash Online Conference 13
