Dynamic Lighting
- author:
- Daniel Sperl
- description:
- Use normal maps for realistic light effects
- lastupdate:
- 2015-11-30
- compatible:
- v2.0
- tag:
- normal maps, lighting, illumination
- homepage:
- https://github.com/Gamua/Starling-Extension-Dynamic-Lighting
- download:
- https://github.com/Gamua/Starling-Extension-Dynamic-Lighting/archive/master.zip
Overview
These classes add support for dynamic lighting to the Starling Framework. This allows you to use normal maps for realistic lighting effects of 2D objects.
baselineConstrained, can only cope with one point/directional light. So be sure to test your project with all profiles you want to support.
Demo
The three symbols at the top represent the light sources, which can be turned on and off. The circle with the “a” in the center represents the ambient light: movement doesn't affect the outcome.
Usage
Creating Normal Maps
To use the extension, you first need to create a set of normal maps for your objects. The recommended way to do that is with the excellent SpriteIlluminator from Andreas Löw (the author of the popular “TexturePacker”).
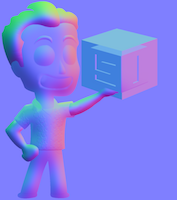
So, let's say you've got a conventional (colored) texture for your character, and one with the normal maps, like here:


Creating the LightStyle
What you're going to do now is create an instance of the “LightMeshStyle” class that's part of this extension, and attach it to any of your Images/Quads/Meshes in Starling. The style also contains some properties that configure how it will appear when hit by light.
var texture:Texture = ...;
var normalMap:Texture = ...;

var image:Image = new Image(texture);
var style:LightStyle = new LightStyle(normalMap);
style.ambientRatio = 0.3;
style.diffuseRatio = 0.7;
style.specularRatio = 0.5;
style.shininess = 8.0;
image.style = style;
The properties have the following meaning:
ambientRatio:The amount of ambient light reflected by the surface. That's the basic illumination of a scene; even if a surface is not hit by light rays, it will receive some ambient light. [Range: 0-1]diffuseRatio:The amount of diffuse light reflected by the surface. Illumination is depending on the angle with which the light hits the surface. [Range: 0-1]specularRatio:The amount of specular light reflected by the surface. That's basically the reflection of the light source on the surface. [Range: 0-1]shininess:This affects the specular reflections on the surface. High values will yield small, point-like specular spots, like you would expect from a mirror. [Range: 0-32]

The math behind the lighting calculations is the Phong reflection model. The image above shows you how the different components add up to the final color of each pixel.
Adding Light Sources
Finally, add at least one light source; otherwise, you won't be able to see your object. There are several kinds of light sources:
- Ambient lights add a basic illumination to all parts of the mesh. Their position and rotation is not relevant to the illumination effect.
- Point lights emit radial light from a single spot, like a candle or light bulb.
- Directional lights emit parallel rays, which is ideal to simulate sunlight.
To create a light source, use the factory methods on the LightSource class:
var ambientLight:LightSource = LightSource.createAmbientLight(Color.WHITE);
addChild(ambientLight);

var pointLight:LightSource = LightSource.createPointLight(Color.RED);
pointLight.x = 200;
pointLight.y = 150;
pointLight.z = -100;
addChild(pointLight);

var directionalLight:LightSource = LightSource.createDirectionalLight(Color.YELLOW);
directionalLight.rotationZ = Math.PI / 2.0;
directionalLight.rotationY = -1;
addChild(directionalLight);
Note that light sources inherit from the Sprite3D class, which means that they may be placed in a 3D space (even if the rest of your scene is typically 2D). Every light that's part of the display list will be picked up automatically by the style.
At development time, it's often useful to have a visual representation of the light. To do that, just enable the showLightBulb property:
pointLight.showLightBulb = true;
You can drag the light symbol around on the screen; hit “Shift” on the Keyboard while moving the mouse to change rotation (useful for directional light) and z-Position.
rotationX/Y/Z properties on the light.
Performance Considerations
Almost all the magic of this extension is happening on the fragment and vertex shaders, i.e. on the GPU. So this extension doesn't cause any significant load on the CPU.
However, the fragment shader code is relatively extensive, especially if you add multiple light sources. On modern mobile hardware, that's not an issue, but be sure to add a fall-back for older devices.
Changelog
- 2015/11/30: First public version
- 2016/02/18: Renamed style and effect classes
- 2016/04/12: Compatibility with latest Starling head revision
- 2016/07/12: Major refactoring, adding support for multiple light sources, specular lighting, and directional lights.
- 2016/09/22: Fixed that setting
scaleX/Yto a negative value made illumination disappear - 2016/09/22: Meshes without a normal texture are now treated as flat surfaces
- 2017/02/27: Fixed wrong specular lighting on iOS
- 2018/08/24: Fixed exception on some MeshStyle properties when not attached to a mesh
User Comments
Feel free to edit this part of the page if you want to add information that's lacking in the above description.
Questions are better asked in the forum, though.